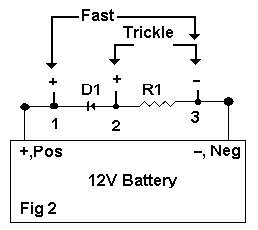
BASIC INFORMATION and THE HOOKUP
To charge a gel cell (12 volt version) it should be allowed to
go up to 14.4V. At that time it is considered (by the
manufacturers, 14.4 - 15 volts) to be fully charged. With a
battery eliminator type charger you may notice that the charge
current continues to drop as the voltage increases. This is a
good thing since you don't want to keep forcing 800 ma into your
battery when it is fully charged anyway.
Smart chargers measure the voltage & reduce the current so that
they keep the battery topped off continually after the battery
reaches full charge. If you measure the voltage at this time
you may notice it changing from time to time as the unit senses
that a bit more current is needed.
Another way to do the same thing is with a resistor/diode
accross the battery. Set the diode so that no current flows
through the resistor when attached to the battery. Then attach
a 12 V battery eliminator (one of which you no doubt have around
the house someplace) accross the resistor. In this way the
eliminator current is split between the battery and the
resistor. Pick the resistor such that its current draw is the
same from the eliminator as the battery's when the battery
reaches 13.8 Volts. With the diode this should be between 13.5
and 13.8 volts on the battery.
For 7 AHr Gel cells to 75 AHr gel cells I found that 125 ohm
five to ten watt resistors work well with the 300 ma @ 12 V
battery eliminators (BE) I sell as chargers. (For D1 I use a
1N4001 diode.)
Connections: Always connect the TCP negative wire to point 3. For
fatser charging connect the TCP positive wire to point 1. For
maintenance charging connect the TCP positive wire to point 2.
 Some experimentation and much patience are needed to find the
best resistor to limit the charge current correctly for a given
battery.
This method can be used to fully charge a gel cell. I leave the
battery/charger system as shown above for days until it reaches
a voltage between 13.5 and 13.8 volts, then place the BE
directly on the battery, this way ALL current from the BE goes
to the battery. Measure the voltage when you do this and you
will notice that the battery voltage climbs to 14.4 volts rather
quickly. The battery is fully charged when this happens. Place
the BE back into the above configuration for continued battery
care, maintenance.
The resistor needed will be different for each BE used since
they are all a bit different, even the ones from the same lot
like the ones I buy, but if you buy a bunch you will be able to
find one resistor value that is good for the majority.
I recommend starting with a 100 ohm five or 10 watt resistor and
the diode. This should get you close (about 13.0 to 13.3 volts)
then add resistance until the battery is fully charged and
continue to measure the voltage for a few days to be sure it
doesn't over charge (go above 13.80 Volts when in maintenance
mode). I have noticed that in this arrangement even adding a
volt meter affects the voltage reading when the battery is close
to full charge.
Also, this arrangement works for lead acid batteries but the
resistance I use is 150 ohms.
Five watt resistors get HOT with the BE's I use so take care not
to touch them for too long a time.
Good-luck and I hope this helps. I am not finished with my
experiments but this is what I have found out so far.
73 de KE3FL/Phil
ke3fl@yahoo.com